
I’m in the process of remodeling our home office and the first stage of the makeover is installing new custom designed cabinetry and a bookcase against the rear wall. If you missed seeing the original design plan you can read about it here.
In this post:
- Looking at our options
- The building process
- Building out the cabinet base
- Installing the cabinets
- Installing the countertop
- Cutting and fitting the bookcase shelving panels
- Wood filler and sanding
- Troubleshooting: From Brad Nails to Liquid Nails
- Installing the bookshelf shelving paneling
- Installing the trim & crown molding
- Installing the bookcase shelving
- Painting the countertop and cabinets
- Final touches
- Final thoughts
- Materials and Cost$
- Recent Blog Posts
Looking at our options
The rear wall in our office is just over 152″ long (12.5′) with an 8′ high ceiling. I looked at multiple stores online for a pre-fabricated bookshelf and cabinet set that I could use in my home office, but I couldn’t find anything that would fit against this wall or was within our budget. Built-in filing cabinets are quite expensive. So, after reading about another bookcase build on DIY Playbook, I decided to custom build it, using materials from both Lowe’s and Home Depot.

I recently built our walk-in closet using hardwood, with fixed shelves. Because we wanted flexibility with our shelving, I decided to go with pre-drilled melamine vs. plywood boards with time.
Melamine boards are an engineered wood product made by heat-fusing a resin-impregnated paper onto a core, typically particleboard or MDF, creating a durable, pre-finished surface. It is known for being budget-friendly, scratch-resistant, and easy to clean.


For the lower cabinets, we went with ready-to-ship 30x12x30 Project Source upper kitchen cabinets. While we preferred to use 24″ lower kitchen cabinets, we didn’t have space for that size because of the radiator and upright piano along one of the walls.

I pre-ordered all of our building materials and had them shipped to our house. Coincidentally, both Lowe’s and Home Deport made their deliveries simultaneously. That led to some funny conversations and unexpected traffic control going in and out of our driveway!
The building process
The building process involves:
- removing the existing baseboards
- building out the base for the cabinetry
- installing the cabinets and screwing them together
- installing the countertop
- installing the side panels for the bookcase shelving
- cutting and installing the shelves
- sanding down the countertop and cabinets
- painting countertop and cabinets
- adding trim, crown molding and baseboards
- loading up the bookcase
Building out the cabinet base
The first step in the building process was removing the existing baseboards where the cabinets were going to be set up. I used a scrap corner piece of baseboard so I could cut the baseboard at a 45 degree angle where the new baseboard will land.

Once the baseboard was removed, I set about cutting 12.5 foot sections of 2×4’s to build out the cabinetry base, first using my circular saw, then using my miter saw. Then I remeasured the distance between the two sections, cut additional 2×4’s to fit, and spaced them out. I didn’t have 2” brad nails handy, so I used 3” inch wood screws to tie the base frame together.

Once the frame was complete, I fitted it into place. I used my stud finder to locate the studs in the wall and again used 3” screws to secure the frame to the wall.

Installing the cabinets
With the base in place it was time to set the cabinets into place. Since the wall was 152.5″ long, and the cabinets were 30″ and there were 5 of them, that left a 1″ gap on each end. This was the most efficient cabinet layout we could work with and the reason we went with 30″ vs. 36″ cabinets.

Although the base frame was level, the two end cabinets did not line up properly, so I added shims beneath them.


I screwed the cabinets into the wall studs and also into the base for stability and added 1″ trim pieces on each end to fill in the gaps.


Installing the countertop
With the lower cabinets installed, it was time to install the countertop. I could not find a lumber store that sold 1″x12″x14′ or 1″x15″x14′ boards, so I ordered two 1″x12″x8′ and 1″x12″x6′ boards that I could mold together using wood filler. While placing them down on the cabinets for fitting and to measure my cuts, I ran into an unexpected issue. The boards weren’t wide enough to cover the countertops! They were short by 1/2″ width-wise! I also noticed there was a 3/8″ variance in the rear wall to one side that I needed to compensate for.

I realized this would also impact the lumber I had ordered for the tops of the bookcase. So, I returned the boards and picked up 1″x15″x8′ and 1″x15″x6′ boards instead. I decided on a 1″ lip over the cabinets, which would allow me to install 1″ trim pieces to cover the bookshelf panels, so I had to trim the boards down to 13″ width-wise in addition to shortening them.
The boards were too wide for my miter saw, so I cut the counter tops using my circular saw, then trimmed them down further with the multi-tool. I used my neighbors table saw to cut the boards length-wise to achieve the 13″ width.


With the countertops ready to be installed, I added support strips in the middle of the cabinets and applied liquid nails along the top of the cabinet frames.


Then I installed the countertops, adding extra weights on top to ensure a tight bond to the cabinets and let the liquid nails try for 24 hours.

Cutting and fitting the bookcase shelving panels
While the liquid nails were drying, I got to work measuring out the bookcase shelving panels and their placement on the countertop. First, I measured out where each panel would be placed, drawing 3 parallel lines marking the center point and the edge lines for each panel.

To make sure the pre-drilled holes were lined up properly, I measured 1″ down from the center of the first holes to establish a consistent starting point and cut the boards. Then I measured up 60 3/4″, so that I could fit in a top piece for each bookcase section.

I read and watched videos describing how melamine boards chip easy. That wasn’t the case when I cut them with my miter saw, but it was an issue when I tried to either trim down the sides using my oscillating multi-tool or used wood screws to secure the panels to walls or to each other. I’ll come back to working with the melamine shelving panels in a moment.


Wood filler and sanding
Once the liquid nails had cured, I used wood filler to fill in the gaps behind and between the countertop boards. I used a small piece of filler rod to fill in the worst of the gaps.


Then I sanded the countertop again using 150 grit sandpaper. The middle seam was a little uneven and required multiple coats of wood filler and sanding.

Troubleshooting: From Brad Nails to Liquid Nails
Back to the melamine shelving panels! Another unexpected issue I ran into was securing the top cover board to the melamine shelving panels. The nail gun didn’t fire reliably and the melamine boards are heavy, too heavy in fact for the 1 1/4″brad nails I had access to.

Each time I tried to lift everything together the brad nails pulled right out and twisted. I also tried using pocket screws, but that didn’t work either. The screws basically bounced off the melamine coating and made a mess of the top seam. The top cover board just wasn’t going to work.


So, I brainstormed and pivoted. I grabbed a left over piece of melamine shelving paneling, flipped it onto the un-drilled side, applied liquid nails to the edges, and slid that into place at the top. It was a better match fit wise, and after 24 hours of curing, was the solution I was looking for! I added extra liquid nails along the inside seams for a tighter bond.

A couple of things to note about melamine boards:
1) Along the edges, one side is taped and the other side is not. You can buy melamine tape and iron it on if needed for your project, but it can impact how you cut your boards if you’re doing single panel shelving (notice the panel to the right in the photo above). In my case, I’m added trim to cover the two panels, so it’s not an issue. But, after I had already cut several boards, I realized this could have been an issue since that would have required flipping the board in the other direction, meaning the pre-drilled holes wouldn’t have lined up properly.
2) Sometimes there are sticker labels on the drilled side, which you need to remove. The stickers can be removed using a razor blade and I used an alcohol swab to remove the leftover residue. In fact I used rubbing alcohol to clean all of the boards before installing them.
Installing the bookshelf shelving paneling
With the countertop secured to the cabinets, and the margins for the shelving panels marked, I set about installing the remaining shelving panels. I ensured that each panel was level as it was installed, trimming the bottoms as needed so that they were snug against the wall, and adding liquid nails along the seams.

The most challenging panel was the last one, due to variances in the side wall corner. The side panel had to be trimmed in the back, shimmed up at the base, and I had to add a 3/8” filler trim piece between the wall and the panel to make it level in each direction.

By this time I realized the brad nail gun I had borrowed from my neighbor simply wasn’t working for this project, so I ultimately decided to get a new 18 gauge multi-option brad nailer from Craftsman. It made all of the difference for the rest of the build.

Installing the trim & crown molding
With the shelving panels installed, it was time to install the 1 1/2″ trim pieces along the top of the panels and along the shelving panel seams. I had to cut custom pieces to fit the far left and right edges.


From there I installed the crown molding, cutting two 8 ft. pieces down to fit. I held off installing the baseboard until after I had removed the cabinet doors for painting.

But, I added caulk along each seam for a cleaner finish.


Installing the bookcase shelving
With the bookcase frame in place, I got to work cutting and fitting the shelves. Each shelf in the middle sections could be cut to the same length, and the far left and right sections were about 1/2″ wider.

As I was adjusting the height of each I quickly discovered that not all of the pre-drilled holes were drilled to the same depth, so the shelf support pins wouldn’t go in all of the way. I used a similar sized drill bit and made the holes deeper.

Once that issue was resolved, the installation went smoothly, with some minor trims along the way.


Painting the countertop and cabinets
It was finally time to paint the countertop and cabinets. We initially considered painting the bookcase either green or blue, however I read and watched some YouTube video showing that sanding and painting melamine boards is a tricky process, and it was not something I really had time for. So, I went to our go-to Valspar Signature paint with an Eggshell finish. This paint already contains a primer, so the application process is painter friendly. I gave the countertops and cabinets a light sanding with 150 grit sand paper to smooth out any rough edges before I got started.

After the first coat of paint dried, I smoothed out each of the surfaces again with 150 grit sand paper. I also noticed that the Eggshell paint from the first coat didn’t match the shelving well, so I switched to Flat paint which worked perfectly.
Final touches
Once all the paint was dry, I sanded off the excess paint that ended up on the back of the cabinet doors.

While I was working on the cabinets, I realized the original 3 ¾” baseboard was not going to be tall enough. So I got 4 ¼” boards and I cut out a new baseboard.


Final thoughts
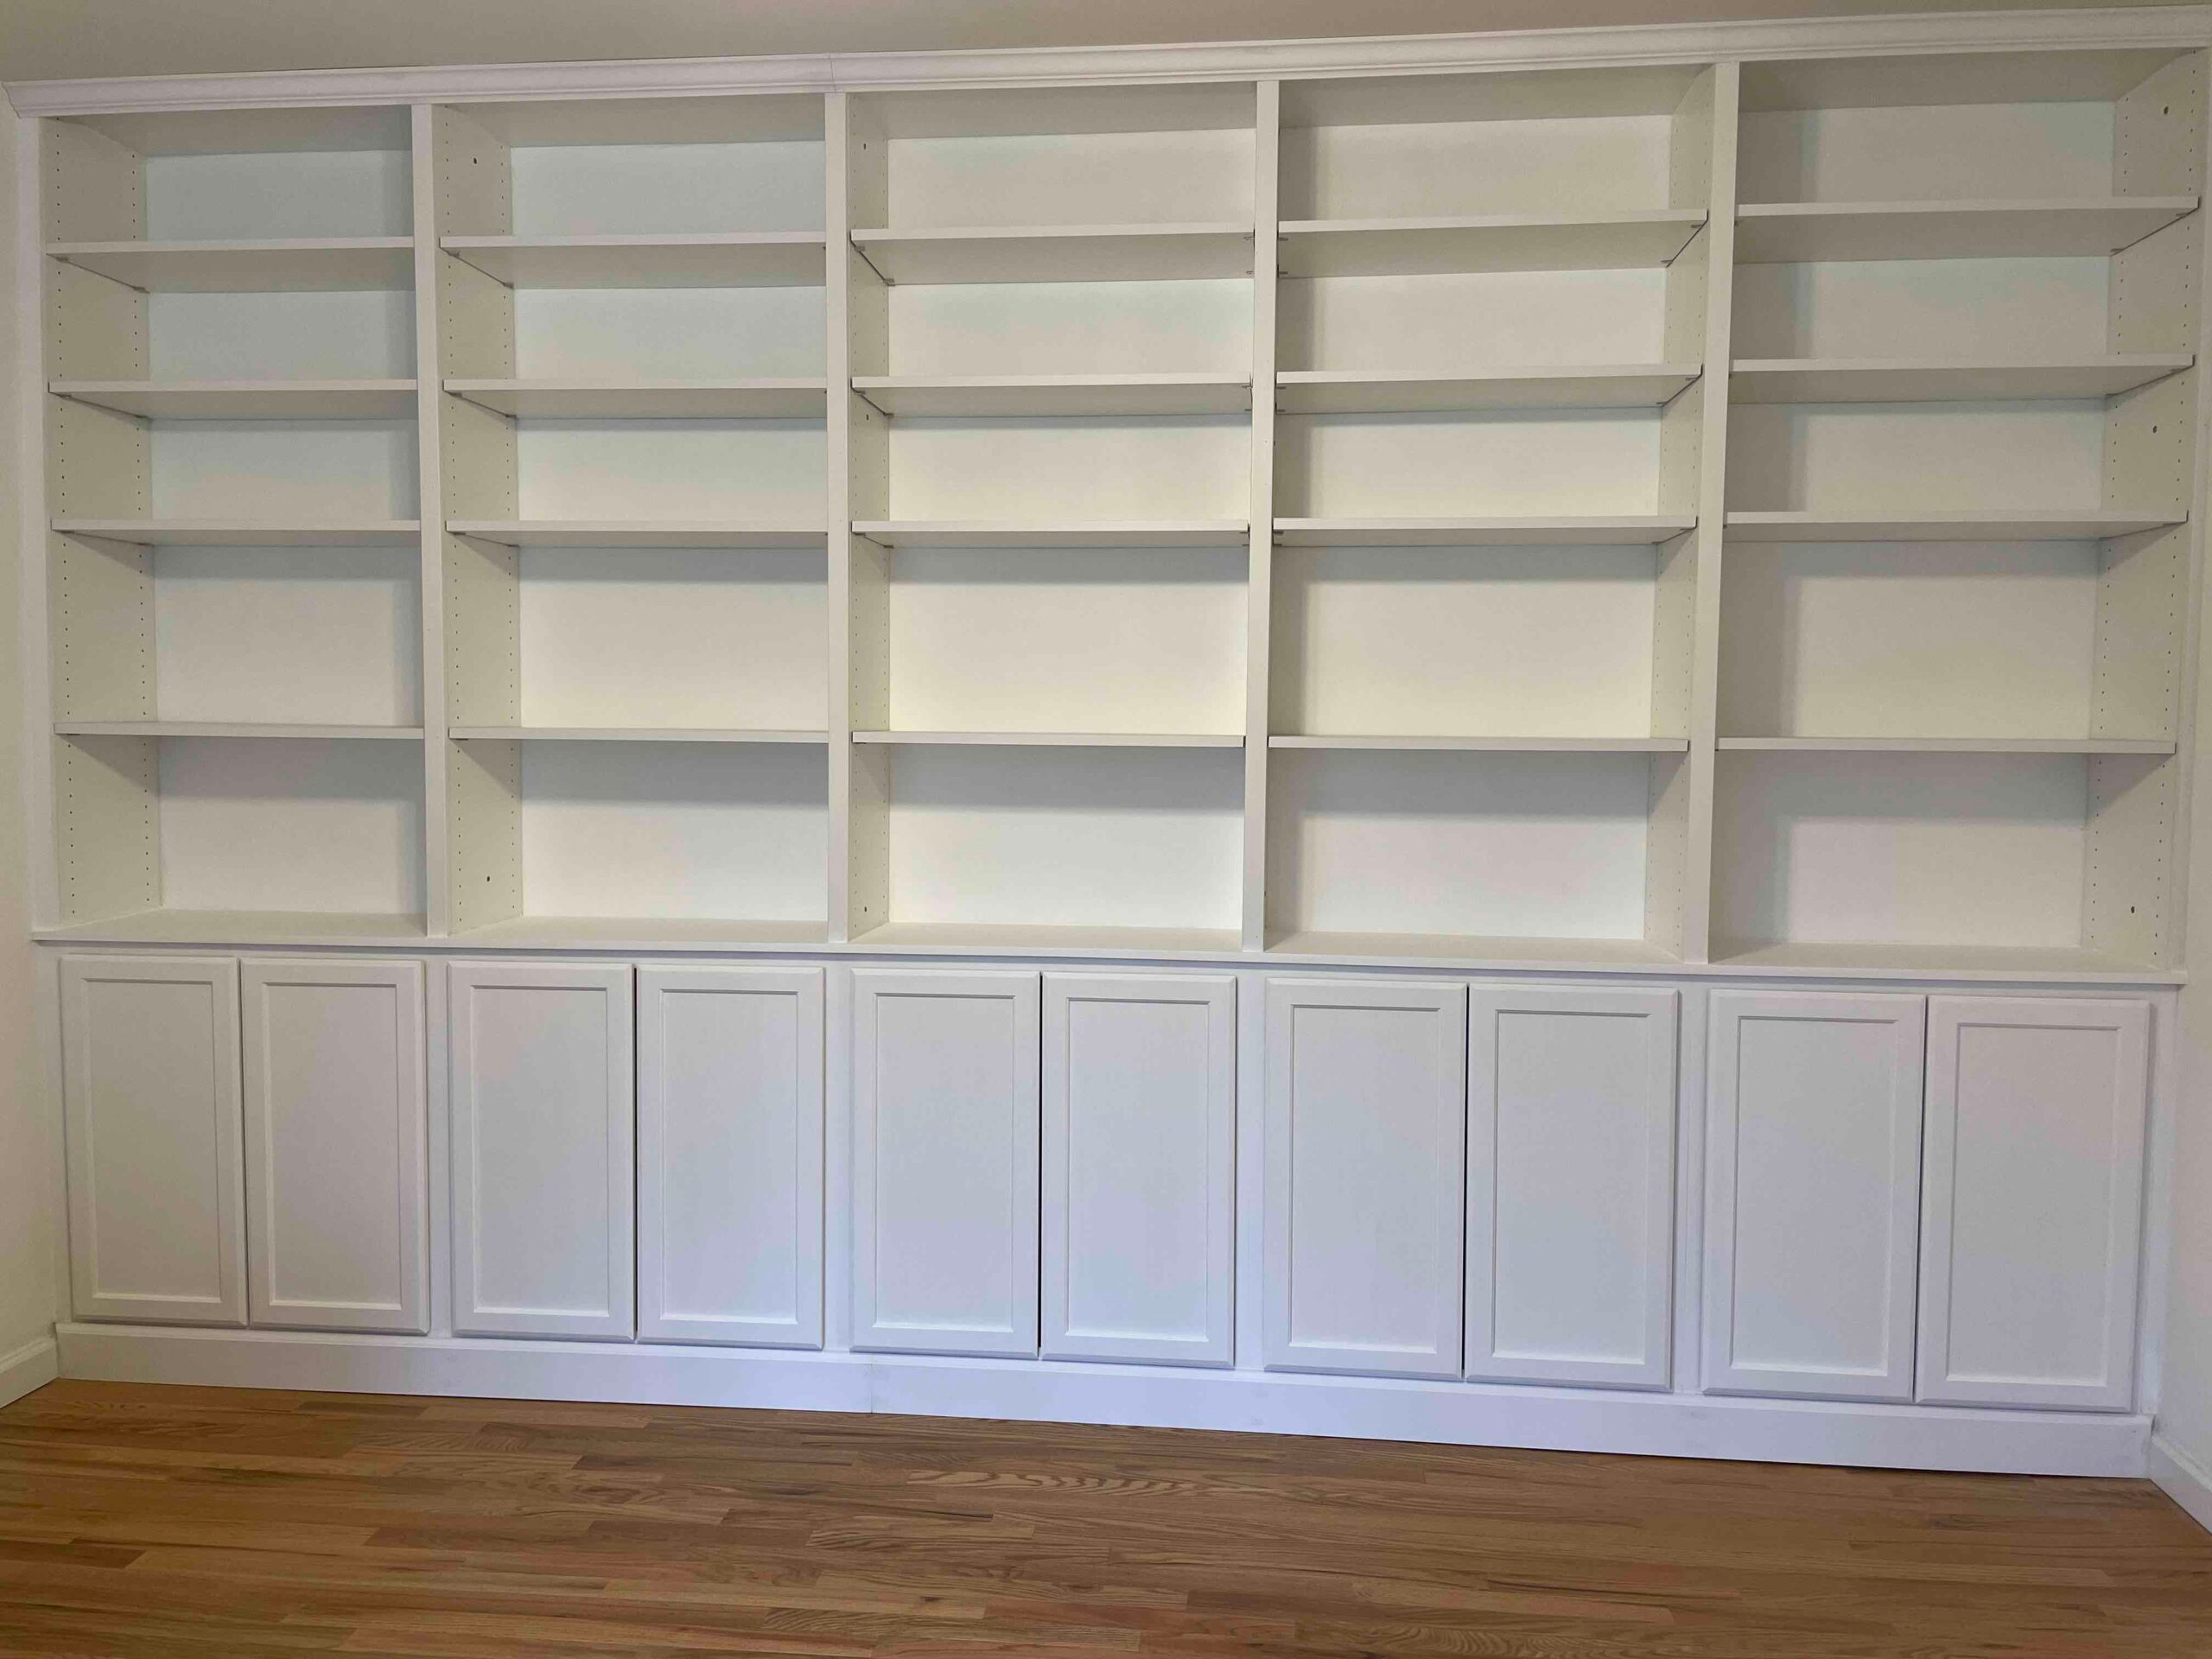
The bookshelf is now finished and we can’t wait to start loading it up with all the books and other items we have stored in our basement. I still have lots of other things to work on in our home office remodel, including refinishing the two desks, and I’ll provide more updates once those projects are completed.

Building with melamine boards was a new experience for me. Alternately, I could have built the bookcase using plywood and a drilling spacer tool from Kreg. I wasn’t aware such a tool existed when I ordered the building materials. It would have added an extra step to the process, but it would have allowed us to paint bookcase and cabinetry a different color. Regardless, similar to other improvements we’ve made to our home, having this bookcase is a game changer for us and we can’t wait to load it up with books and other items stored in our basement.
If you are thinking of building a new bookcase for your home, below is a breakdown of the materials and costs for this project. If you found this post helpful, you may also want to check out how I built out our primary walk-in closet or deck remodel.
Materials and Cost$
Home Depot
Liquid Nails-$4.98
Melamine Pre-Drilled Side Panels-$22.97 ea. QTY 10-$229.70
1x3x8 Trim Board-$6.98
Wood Filler-$14.98
Lowe’s
ALEX Plus 10.1-oz Paint and Trim White Paintable Latex Caulk-$3.78
Melamine Shelves-$25.98 ea. QTY 8-$197.44
Nickel Shelf Pins (12 pack)-$4.96 ea. QTY 6-$28.38
Project Source 30x12x30 Lower Cabinets-$114 ea. QTY 5x-$541.50
9/16-in x 4-1/4-in x 8-ft Colonial Primed Finger Jointed Pine 620 Baseboard Moulding-$16.53 /ea. QTY 2-$33.06
1-in x 2-in x 8-ft Radius Edge Painted MDF Board-$7.29 /ea. QTY 5-$36.45
Unfinished S4S Spruce pine fir Edge-glued Project Softwood Board-$24.07 /ea. QTY 2-$48.14
10 x 3-in Yellow zinc Interior Cabinet Screws-$12.33
2-in x 4-in x 96-in Kiln-dried Whitewood #2 Stud-$3.78
2-in x 4-in x 14-ft Fir Kiln-Dried Lumber-$9.73 ea. QTY 2-$18.48
RELIABILT 8-ft Unfinished S4S Spruce pine fir Edge-glued Project Softwood Board-$32.35 ea. QTY 2-$64.70
9/16-in T x 2-5/8-in W x 8-ft L Pine Primed 53 Crown Moulding-$17.36 ea. QTY 2-$32.98
Valspar 2 -Pack 4-in x 3/8-in Nap Mini Woven Paint Roller Cover-$5.98 ea. QTY 2-$11.36
Project Total: $1,691.66
Tools Used
Lowe’s Tools
48″ Craftsman Level-$21.98
Craftsman Brad Nail Gun-$255.53
Dewalt Miter Saw-$299.00
Dewalt Sander-$89
Laser Level Pro-$11.99
Square-$7.98
Circular Saw-$99
Face Mask-$7.98
Safety Glasses-$9.95
Ace Hardware
Porter Cable Oscillating Multi-tool-$129.00
Wallmart
Black & Decker 6 amp Power Drill-$52.20
Table Saw (borrowed from neighbor)


Leave a Reply